Installing Microsoft® Windows PowerShell Extensions for Microsoft SQL Server 2016 (AKA sqlps)

The PowerShell modules (aka sqlps) are installed by default when installing Microsoft SQL Server.

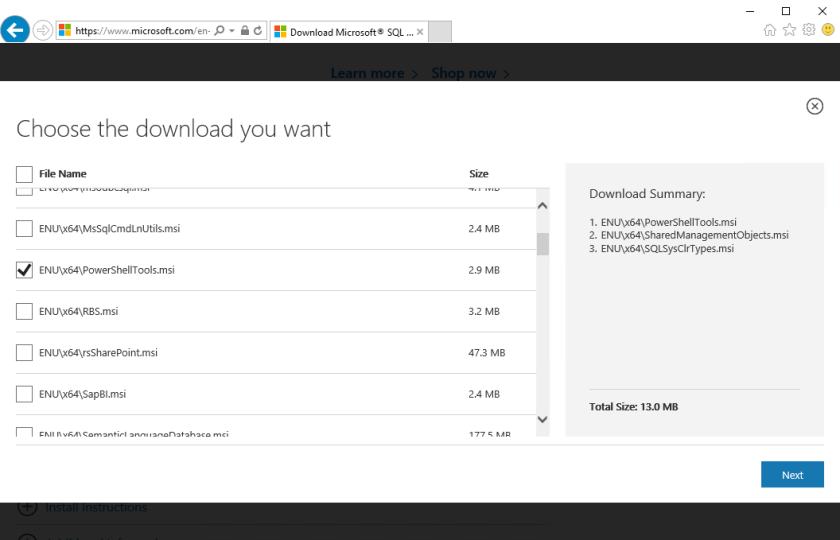
You can manually install the PowerShell Extensions for SQL Server 2016 by installing the following components from the Microsoft® SQL Server® 2016 Feature Pack:

  1. Microsoft® System CLR Types for Microsoft SQL Server® 2016 (SQLSysClrTypes.msi)
  2. Microsoft® SQL Server® 2016 Shared Management Objects (SharedManagementObjects.msi)
  3. Microsoft® Windows PowerShell Extensions for Microsoft SQL Server® 2016 (PowerShellTools.msi)

sqlps-install-list

Check if the module has been successfully installed:

# Import the SQL Server Module.
Import-Module Sqlps -DisableNameChecking

# To check whether the module is installed.
Get-Module -ListAvailable -Name Sqlps

Check-out the official complete guide SQL Server PowerShell.

Getting Started with Azure PowerShell (Classic)

Thanks to opsgility (original post).

For the new AzureRM (resource manager model) please check the official: Get started with Azure PowerShell cmdlets.

Download the Azure PowerShell Cmdlets

Windows install that you can also found at Microsoft Azure Downloads

Configure your Azure Subscription with the Azure PowerShell Cmdlets.

The simplest way to access your Azure subscription from PowerShell is to use the Add-AzureAccount cmdlet.

Add-AzureAccount

After executing the cmdlet a dialog will appear to prompt you to login with your Microsoft or Organization account. After you login, you will have access for 12 hours before you have to login again.

Enumerating and selecting a subscription

You can use the PowerShell cmdlets to enumerate and view your current subscription settings.
Here are some of the more handy ones to know about:

# Enumerates all configured subscriptions on your local machine.
Get-AzureSubscription

# Returns details only on the specified subscription
Get-AzureSubscription -SubscriptionName "mysubscription"

# Select the subscription to use
Select-AzureSubscription -SubscriptionName "mysubscription"

# Sets the mysub subscription to be the default if one is not selected.
Set-AzureSubscription -DefaultSubscription "mysub"

CONFIGURING STORAGE WITH THE CURRENTSTORAGEACCOUNT PARAMETER

When using the WA Cmdlets with Virtual Machines (IaaS) or Cloud Services (PaaS) you will need to specify the CurrentStorageAccount for your subscription. This is basically the storage account that will be used for creating VHDs or uploading .cspkg files. For virtual machines this storage account has to be in the same datacenter that you plan on creating virtual machines in.

Set-AzureSubscription -SubscriptionName "mysub" -CurrentStorageAccount "mystorageaccount"

To discover if you have a storage account or create a new storage account from PowerShell:

# Discover whether you have a storage account already
Get-AzureStorageAccount 

# Creates a new storage account in the West Europe data center
New-AzureStorageAcount -StorageAccountName "mystorageaccountname" -Location "West Europe"

Which of course begs the question – how do I know which data centers are available?

The following cmdlet will give you that information:

Get-AzureLocation

This is everything you need to configure the Azure PowerShell cmdlets for your subscription!
Performance best practices for SQL Server in Azure Virtual Machines (link to resources)

How to create striped disk on azure (AKA Raid 0)

Disk Striping use multiple disks and stripe them together to get a combined higher IOPS and Throughput limit. Note that the combined limit per VM should be higher than the combined limits of attached premium disks.

You can check the maximum number of disks you can add to a virtual machine from here: Sizes for Windows virtual machines in Azure

1. Create “new disk” from powershell:

clear

# RM stands for resource manager, and is the new way of managing things in Azure

# you need to login the first time using this command
# Login-AzureRmAccount

$vm = Get-AzureRmVM -ResourceGroupName "md-test-stripe" -Name "md-test-stripe"

# adds 16 disks
for($i=1; $i -le 16; $i++) {
    $name = "md-test-stripe-disk{0:00}" -f $i
    $lun = $i - 1
    $vhdUri = "https://mdteststripedisks447.blob.core.windows.net/vhds/md-test-stripe-disk{0:00}.vhd" -f $i

    Write-Host "Add-AzureRmVMDataDisk -VM $vm -Name $name -DiskSizeInGB 16 -Lun $lun -Caching None -VhdUri $vhdUri -CreateOption Empty"

    $vm = Add-AzureRmVMDataDisk -VM $vm -Name $name -DiskSizeInGB 16 -Lun $lun -Caching None -VhdUri $vhdUri -CreateOption Empty
}

$vm.DataDiskNames

# uncomment when you are ready, this updates the VM on azure!
# Update-AzureRmVM -ResourceGroupName "md-test-stripe" -VM $vm

2. Create “new storage pool” from server manager with all the new disks you added

3. Create “new virtual disk” from powershell:

New-VirtualDisk -FriendlyName "sql-stripe" -StoragePoolFriendlyName "sql-stripe" -Interleave 65536 -NumberOfColumns 16 -ProvisioningType Fixed -ResiliencySettingName "Simple" -UseMaximumSize

4. Create “new volume” from server manager formatting in NTFS with allocation unit size set to 64KB

Porting from SQLIO to DISKSPD: How to Test Disk Performance for SQL Server

DISKSPD TESTS

Original post related to SQLIO took from brentozar blog.

The latest update to DiskSpd can be downloaded from https://aka.ms/diskspd.

diskspd -w100 -t8 -d60 -o32 -r -b8K -Sh -L -c20G C:\test.dat
diskspd -w0 -t8 -d60 -o32 -r -b8K -Sh -L -c20G C:\test.dat
diskspd -w100 -t8 -d60 -o32 -si -b64K -Sh -L -c20G C:\test.dat
diskspd -w0 -t8 -d60 -o32 -si -b64K -Sh -L -c20G C:\test.dat

What Do the DISKSPD Parameters Mean?

While we’re looking at that set of commands, here’s a quick breakdown:

  • -w100 and -w0: means we’re testing writes (100% writes) or reads (0% writes).
  • -t8 and -o32: means 8 threads with up to 32 outstanding requests at once.
    DISKSPD isn’t CPU-bound at all, and you can use more threads than you have processors.
    The more load we throw at storage, the faster it goes – to a point.
  • -d60: means the test will last 60 seconds
  • -b8K and -b64K: the size of our IO requests in kilobytes.
    SQL Server does a lot of random stuff in 8KB chunks,
    and we’re also testing sequential stuff in 64KB chunks.
  • -r and -s[i]: random versus sequential access.
    Many queries jump around randomly in the database, whereas things like backups,
    bulk loads, and table scans generally work sequentially. If the optional interlocked (i) qualifier is used, a single interlocked offset is shared between all threads operating on a given target so that the threads cooperatively issue a single sequential pattern of access to the target.
  • -L: measure latency statistics.
  • -Sh: equivalent -Suw, disable software caching, equivalent to FILE_FLAG_NO_BUFFERING and enable writethrough (no hardware write caching), equivalent to FILE_FLAG_WRITE_THROUGH.
  • -c20G: create a file of 20GB. Size can be stated in bytes or KiB/MiB/GiB/blocks.

You’ll notice I’m using a lot of general terms here about how some application patterns work.

Every SQL Server database has its own access patterns – random, sequential, big chunks, small pieces, and so on.

The four test lines you see above are shorthand examples of how some SQL Server IO patterns work.

Check all the command line parameters on the official github repo wiki.

Powershell Commands for Visual Studio Team Services (VSTS, AKA VSO)

For instance you can set a variable like this:

Examples:

##vsotask.setvariable variable=testvar;]testvalue
##vso[task.setvariable variable=testvar;issecret=true;]testvalue

in powershell:

Write-Host "##vso[task.setvariable variable=testvar;]testvalue"

Here’s the complete list:

https://github.com/Microsoft/vsts-tasks/blob/master/docs/authoring/commands.md

Happy scripting!