Installing Microsoft® Windows PowerShell Extensions for Microsoft SQL Server 2016 (AKA sqlps)

The PowerShell modules (aka sqlps) are installed by default when installing Microsoft SQL Server.

You can manually install the PowerShell Extensions for SQL Server 2016 by installing the following components from the Microsoft® SQL Server® 2016 Feature Pack:

  1. Microsoft® System CLR Types for Microsoft SQL Server® 2016 (SQLSysClrTypes.msi)
  2. Microsoft® SQL Server® 2016 Shared Management Objects (SharedManagementObjects.msi)
  3. Microsoft® Windows PowerShell Extensions for Microsoft SQL Server® 2016 (PowerShellTools.msi)

sqlps-install-list

Check if the module has been successfully installed:

# Import the SQL Server Module.
Import-Module Sqlps -DisableNameChecking

# To check whether the module is installed.
Get-Module -ListAvailable -Name Sqlps

Check-out the official complete guide SQL Server PowerShell.

Getting Started with Azure PowerShell (Classic)

Thanks to opsgility (original post).

For the new AzureRM (resource manager model) please check the official: Get started with Azure PowerShell cmdlets.

Download the Azure PowerShell Cmdlets

Windows install that you can also found at Microsoft Azure Downloads

Configure your Azure Subscription with the Azure PowerShell Cmdlets.

The simplest way to access your Azure subscription from PowerShell is to use the Add-AzureAccount cmdlet.

Add-AzureAccount

After executing the cmdlet a dialog will appear to prompt you to login with your Microsoft or Organization account. After you login, you will have access for 12 hours before you have to login again.

Enumerating and selecting a subscription

You can use the PowerShell cmdlets to enumerate and view your current subscription settings.
Here are some of the more handy ones to know about:

# Enumerates all configured subscriptions on your local machine.
Get-AzureSubscription

# Returns details only on the specified subscription
Get-AzureSubscription -SubscriptionName "mysubscription"

# Select the subscription to use
Select-AzureSubscription -SubscriptionName "mysubscription"

# Sets the mysub subscription to be the default if one is not selected.
Set-AzureSubscription -DefaultSubscription "mysub"

CONFIGURING STORAGE WITH THE CURRENTSTORAGEACCOUNT PARAMETER

When using the WA Cmdlets with Virtual Machines (IaaS) or Cloud Services (PaaS) you will need to specify the CurrentStorageAccount for your subscription. This is basically the storage account that will be used for creating VHDs or uploading .cspkg files. For virtual machines this storage account has to be in the same datacenter that you plan on creating virtual machines in.

Set-AzureSubscription -SubscriptionName "mysub" -CurrentStorageAccount "mystorageaccount"

To discover if you have a storage account or create a new storage account from PowerShell:

# Discover whether you have a storage account already
Get-AzureStorageAccount 

# Creates a new storage account in the West Europe data center
New-AzureStorageAcount -StorageAccountName "mystorageaccountname" -Location "West Europe"

Which of course begs the question – how do I know which data centers are available?

The following cmdlet will give you that information:

Get-AzureLocation

This is everything you need to configure the Azure PowerShell cmdlets for your subscription!

Powershell Commands for Visual Studio Team Services (VSTS, AKA VSO)

For instance you can set a variable like this:

Examples:

##vsotask.setvariable variable=testvar;]testvalue
##vso[task.setvariable variable=testvar;issecret=true;]testvalue

in powershell:

Write-Host "##vso[task.setvariable variable=testvar;]testvalue"

Here’s the complete list:

https://github.com/Microsoft/vsts-tasks/blob/master/docs/authoring/commands.md

Happy scripting!

PSRemoting into non-domain joined computers

PSRemoting into non-domain joined computers

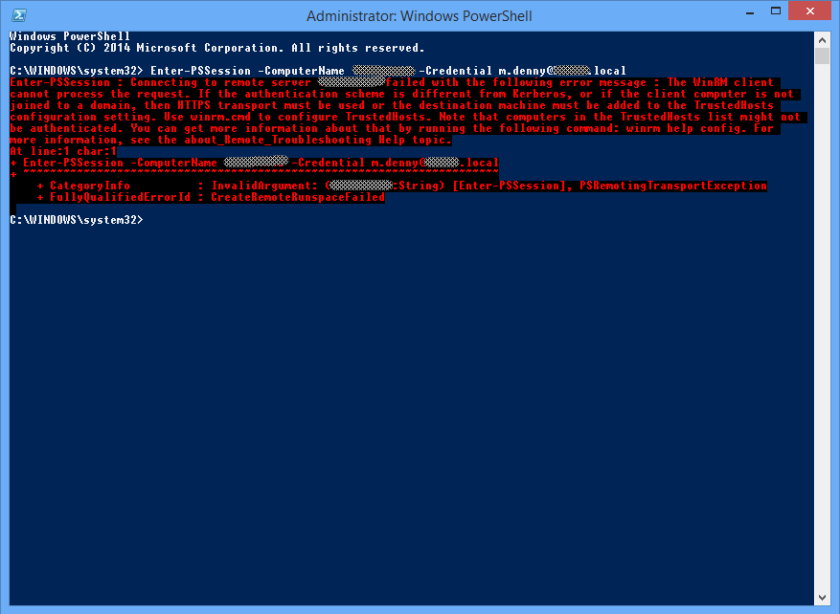
Today I was trying to Enter-PSSession on a remote machine, from my machine that is not joined to the same domain, and I start getting all kind of authentication error. Basically the problem reside on YOUR machine, not on the server, windows server 2012 has the remoting enabled by default (of course you need to open firewall as well), so what’s the problem? By default, local machine allow remote ps only using Kerberos, and to allow other kind of connection you need to trust the remote machine, but how?

You need to set the TrustedHosts! (to use HTTP protocol, see below for a more secure approach using HTTPS)

To see what’s in the trusted host you can use the Get-Item command:

Get-Item WSMan:\localhost\Client\TrustedHosts

And here’s how to set the value with the Set-Item command:

Set-Item WSMan:\localhost\Client\TrustedHosts -Value "*" -Force

Here I’ve set to trust all the remote end-points, so the system does not bore me again, obviously this could harm your computer.

The TrustedHosts item, contains a comma separated value, so to add more server you have to provider a CSV, for instance:

Set-Item WSMan:\localhost\Client\TrustedHosts -Value "10.5.1.1,10.5.1.2" -Force

To clear the trusted host you can use the Clear-Item command as follow:

Clear-Item WSMan:\localhost\Client\TrustedHosts -Force

If you don’t specify -Force, you will be warned before continue with the command.

Now you can run your commands remotely on the target machine:

Enter-PSSession -ComputerName 10.5.1.1 -Credential m.denny@mydomain.local

If you plan to use HTTP this guide is fine, however I strongly recommend to implement HTTPS for encrypting the traffic between the client and remote server.

You can follow this guide (took from appveyor wiki) on how to enabling powershell remoting on server and enabling HTTPS protocol.

PowerShell Call Operator (&): Using an array of parameters to solve all your quoting problems

Peace For All

I would like to thank James Brundage (blog!) for telling me about this. Suffice to say, the man is seriously into automation.

Alright, if you just want to learn about using arrays of parameters with the call operator (&) and skip all the explanation of what doesn’t work, scroll down to the bottom. I am a big believer in understanding solutions though, so this post will detail everything that doesn’t work and slowly build up towards what does work.

The last blog post I did on this topic was about using Invoke-Expression to solve problems with passing parameters to external programs. I resorted to using Invoke-Expression since (as an undocumented side effect?) Invoke-Expression will strip off quotes from parameters to commands it executes. But in some circles using Invoke-Expression to execute programs is considered heresy. It is thanks to James Brundage that I was able to figure out how to better use &…

View original post 705 more words

Start all services filtering by Name and StartMode / StartupType using PowerShell

Sometimes I need to start or restart a lot of services belonging to my application, all having the product / company name as prefix, and I would like to start it all, but not the ones that are flagged as Manual.

To simple start all the services that match a prefix you would do something like this:

Start-Service "MyProduct*"

but when you need to start the service that are not flagged as Manual startup, there’s no command/filter directly in powershell command, but you need to use Wmi objects in this way:

Get-WmiObject win32_service | where { $_.Name -like "MyProduct*" -and $_.StartMode -ne "Manual" } | Start-Service

With the same syntax you can of course, do Get-Service, Stop-Service, and all the other related commands.

—————–
UPDATE 16/03/2015
—————–

A BETTER WAY FOR WIN >= 2012!

Starting from Powershell 3.0 you can use the Get-CimInstance Win32_Service command, where CIM is a new common interface to access windows and non-windows OS, created to focus the new cloud oriented systems. CIM is also performing better than WMI.

Get-CimInstance Win32_Service -Filter "Name like 'MyProduct%' AND StartMode != 'Manual'" | Start-Service

Here I’m using -Filter instead of Where-Object, just because the first usually performs better.

PowerShell: Set the Location the Executing Script Path

I already knew about the proper way to get the executing path:

Split-Path -Path $MyInvocation.MyCommand.Definition -Parent

…but today I’ve saw another way to set the scope of the current location to a desired path (open-source code is the most powerful resource):

NAME
Push-Location

SYNOPSIS
Adds the current location to the top of a location stack.

SYNTAX
Push-Location [[-Path] <String>] [-PassThru] [-StackName <String>] [-UseTransaction [<SwitchParameter>]]
[<CommonParameters>]

Push-Location [-LiteralPath <String>] [-PassThru] [-StackName <String>] [-UseTransaction [<SwitchParameter>]]
[<CommonParameters>]

DESCRIPTION
The Push-Location cmdlet adds (“pushes”) the current location onto a location stack. If you specify a path,
Push-Location pushes the current location onto a location stack and then changes the current location to the
location specified by the path. You can use the Pop-Location cmdlet to get locations from the location stack.

By default, the Push-Location cmdlet pushes the current location onto the current location stack, but you can use
the StackName parameter to specify an alternate location stack. If the stack does not exist, Push-Location creates
it.

For more information about location stacks, see the Notes.

RELATED LINKS
Online Version: http://go.microsoft.com/fwlink/p/?linkid=293892
Get-Location
Pop-Location
Set-Location
about_Providers

REMARKS
To see the examples, type: “get-help Push-Location -examples”.
For more information, type: “get-help Push-Location -detailed”.
For technical information, type: “get-help Push-Location -full”.
For online help, type: “get-help Push-Location -online”

It is actually a stack, so it could be very useful in situation where you need to temporary change the scope of the location for a sets of commands and then return back to the previous path. This is mandatory when your script is a part of a bigger script, and you also don’t have the ownership (think about PsGet) of that script, so it’s a best practice to push your needed location, and before the script ends pop it (Pop-Location) to resume the path used from the script who called your.

Combining together both commands you just have to add on the top of the script this command:

Push-Location (Split-Path -Path $MyInvocation.MyCommand.Definition -Parent)

The follow is the sample script where I’ve saw this command in action, it is a PsGet script to enable posh-git module (profile.example.ps1):

Push-Location (Split-Path -Path $MyInvocation.MyCommand.Definition -Parent)

# Load posh-git module from current directory
Import-Module .\posh-git

# If module is installed in a default location ($env:PSModulePath),
# use this instead (see about_Modules for more information):
# Import-Module posh-git

# Set up a simple prompt, adding the git prompt parts inside git repos
function global:prompt {
    $realLASTEXITCODE = $LASTEXITCODE

    # Reset color, which can be messed up by Enable-GitColors
    $Host.UI.RawUI.ForegroundColor = $GitPromptSettings.DefaultForegroundColor

    Write-Host($pwd.ProviderPath) -nonewline

    Write-VcsStatus

    $global:LASTEXITCODE = $realLASTEXITCODE
    return "> "
}

Enable-GitColors

Pop-Location

Start-SshAgent -Quiet