Powershell Commands for Visual Studio Team Services (VSTS, AKA VSO)

For instance you can set a variable like this:

Examples:

##vsotask.setvariable variable=testvar;]testvalue
##vso[task.setvariable variable=testvar;issecret=true;]testvalue

in powershell:

Write-Host "##vso[task.setvariable variable=testvar;]testvalue"

Here’s the complete list:

https://github.com/Microsoft/vsts-tasks/blob/master/docs/authoring/commands.md

Happy scripting!

Software on the hosted build server

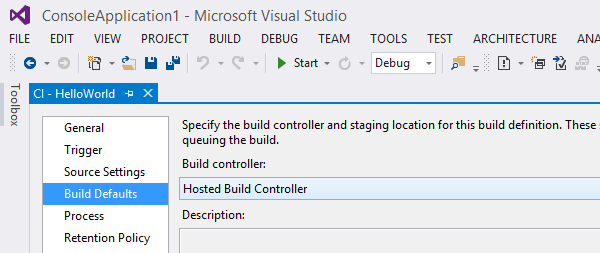
Took directly from visual studio site: Hosted build controller.

You can check the detail list, and install the visual studio extension “Avanade Extensions for VS2012” (VS2013 version) to track the software installed on the hosted build server using the Software Inventory functionality.

The hosted build server is deployed with the following software:

  • Windows Server 2012 R2, 64-bit environment, with Windows PowerShell
  • Team Foundation Build (Team Foundation Server 2013)
  • Visual Studio
    • Visual Studio 2013 Update 2 RC
    • Visual Studio SDK 2013 RTM
    • Visual Studio 2012 Ultimate Update 4
    • Visual Studio SDK 2012 RTM
    • Visual Studio 2010 SP1
  • The .NET Framework
    • .NET 4.5.1
    • .NET 4.5
    • .NET 3.5 SP1
  • Microsoft Azure
    • SDK 2.3
    • SDK 2.2
    • SDK 2.1
    • SDK 2.0
    • SDK 1.8
    • SDK 1.7
  • Other components
    • Apache ANT 1.9.3
    • Apache Maven 3.1.1
    • Java Standard Edition Development Kit 1.7 U51
    • Microsoft Office Developer Tools for Visual Studio 2013 Update 1
    • Node.js 0.10.26
    • Node.js Tools 1.0 Alpha for Visual Studio 2013
    • SharePoint 2010 and SharePoint 2013
    • SQL Server Data Tools for Visual Studio 2010, Visual Studio 2012, and Visual Studio 2013
    • TFS Build Extensions
    • TypeScript 1.0
    • WIX Toolset 3.7
    • Web Deploy 3.0
    • Windows Phone SDK 8.0


NuGet + Visual Studio: Automatic Package Restore of Different Solutions to the Same Folder

Attachment with the sample: NugetPackageRestore.zip

Today I had a problem using nuget package restore in a quite complex project that has multiple projects and multiple solutions file located in different folders, so that nuget was restoring the packages in a wrong folder for some of my solutions.

For instance if you have a file structure like this:

Root
  |- ProjectA
  |- |- ProjectA.Model
  |- |- |- ProjectA.Model.csproj
  |- |- ProjectA.Service
  |- |- |- ProjectA.Service.csproj
  |- |- ProjectA.sln
  |- Project B
  |- |- ProjectB.Model
  |- |- |- ProjectB.Model.csproj
  |- |- ProjectB.Service
  |- |- |- ProjectB.Service.csproj
  |- |- ProjectB.sln
  |- AllMyProjects.sln

AllMyProjects.sln simply contains all the projects (ProjectA.Model.csproj, ProjectA.Service.csproj, ProjectB.Model.csproj, ProjectB.Service.csproj).

When you run the build for all the 3 solutions, nuget by default will restores everything in a folder “packages” located at the same level of the solution file, producing something like this:

Root
  |- Packages
  |- (...all the packages...)
  |- ProjectA
  |- |- Packages
  |- |- |- (...all the packages...)
  |- |- ProjectA.Model
  |- |- |- ProjectA.Model.csproj
  |- |- ProjectA.Service
  |- |- |- ProjectA.Service.csproj
  |- |- ProjectA.sln
  |- Project B
  |- |- Packages
  |- |- |- (...all the packages...)
  |- |- ProjectB.Model
  |- |- |- ProjectB.Model.csproj
  |- |- ProjectB.Service
  |- |- |- ProjectB.Service.csproj
  |- |- ProjectB.sln
  |- AllMyProjects.sln

Now, if you first compile the ProjectA.sln and ProjectB.sln, also the AllMyProjects.sln will compile fine, but this just because the packages will be correctly restored by the two specific solution ProjectA.sln and ProjectB.sln, but if you try to clean up all the packages folder, and build the AllMyProjects.sln first, you will get a lot of compile error, this because the projects are poiting the nuget restored dll(s) inside specific folders and not a generic folder instead.

One possible fix to this, is to move all the solutions file, under the same folder, to le restore the packages to the same folder for every project, but I preferred to leave the structure as is, and try to force the nuget packages restore process. In fact there’s a key configuration “repositoryPath” to override the default packages folder location.

These are the steps to move the packages folder to a common location:

1 – Create a NuGet.config file under the root folder (nuget will find and use this file using a recursive search, starting from .nuget folder of the solution folder):

<?xml version="1.0" encoding="utf-8"?>
<configuration>
  <config>
    <add key="repositoryPath" value="$\..\Packages" />
  </config>
  <solution>
    <add key="disableSourceControlIntegration" value="true" />
  </solution>
</configuration>

$ = refers to the NuGet.config file
we need to type “$\..\” and not just “$\” to set the Root folder just because I think is a kind of bug.

You will end-up with something like this:

Root
  |- ProjectA
  |- |- ProjectA.Model
  |- |- |- ProjectA.Model.csproj
  |- |- ProjectA.Service
  |- |- |- ProjectA.Service.csproj
  |- |- ProjectA.sln
  |- Project B
  |- |- ProjectB.Model
  |- |- |- ProjectB.Model.csproj
  |- |- ProjectB.Service
  |- |- |- ProjectB.Service.csproj
  |- |- ProjectB.sln
  |- AllMyProjects.sln
  |- NuGet.config
2a – Edit all the projects file and fix the dll reference by replacing the old relative path with the new one

2b – In alternative to 2a, you can run the nuget command “Update-Package –reinstall” from the nuget “Package Manager Console”, but this can dirty you projects, then I prefer do it manually directly from notepad 🙂

3 – Delete all the Packages folder and try to build every solution. To best test that everything is fine, before build a solution always delete the packages folder. You should see the “Packages” folder only once:

Root
  |- Packages
  |- (...all the packages...)
  |- ProjectA
  |- |- ProjectA.Model
  |- |- |- ProjectA.Model.csproj
  |- |- ProjectA.Service
  |- |- |- ProjectA.Service.csproj
  |- |- ProjectA.sln
  |- Project B
  |- |- ProjectB.Model
  |- |- |- ProjectB.Model.csproj
  |- |- ProjectB.Service
  |- |- |- ProjectB.Service.csproj
  |- |- ProjectB.sln
  |- AllMyProjects.sln
  |- NuGet.config

TFS: Delete Folder without a Workspace

Sorry about this title, but actually you cannot delete a source controlled folder without assigning first a workspace, BUT, but you can avoid wasting disk space avoiding to recursively download all the files in that folder, so it’s what I think you want to do, and then here’s the steps:

  1. Open the “Developer Command Prompt for VS2013”
  2. Go to the workspace folder where you have the folder you want to get without recursively get all the items
  3. run the command “tf get <folder path>” without the /recursive switch

TF will get only the first level content of the <folder path>, then you can go back on visual studio team explorer, delete the folder and checkin the changes 🙂

TFS: Scorch / Reconcile to ensure source control and the local disk are identical with tfs power tools tftp.exe / tf.exe

Today looking at my tfs workspace I’ve found that its dimension was really huge than the real space that would taken from a clean download of the sources. This of course is because of all the binaries build for debug, release and all the other build configurations, but also from old the files, branches, projects, that are not anymore in the source control, but still in the folder because eventually tfs forgot to remove.

To clean this situation I’ve found the “tfs power tools” really helpful, using the command: tfpt scorch (starting from vs 2017 you can do the same simply using tf.exe so you don’t need to download any extension at all!!)

For Visual Studio >=2017

Just run this command in the root folder of your workspace:

tf reconcile /clean /recursive

Old version of Visual Studio

You can download the Team Foundation Server 2010 + SP1 version from here:

http://visualstudiogallery.msdn.microsoft.com/c255a1e4-04ba-4f68-8f4e-cd473d6b971f

the TFS 2012 version from here:

http://www.microsoft.com/en-us/download/details.aspx?id=35775

the TFS 2013 version from here:

http://visualstudiogallery.msdn.microsoft.com/f017b10c-02b4-4d6d-9845-58a06545627f

and finally the TFS 2015 version from here:

https://visualstudiogallery.msdn.microsoft.com/898a828a-af00-42c6-bbb2-530dc7b8f2e1

Here’s the complete help took from the executable itself (2011 version for TFS 2010 + SP1):

tfpt scorch – Ensure source control and the local disk are identical

Your local disk will be scanned for:
(1) items that are not in source control
(2) items which are different on disk from the workspace version
(3) items which are in the workspace but are missing on disk

Items not in source control will be deleted from disk, just as with the
tfpt treeclean command. Items determined to be different on disk from the
workspace version will be redownloaded from the server. Items missing on
disk will also be redownloaded. Items with pending changes are exempted.

By default, items deleted from your local disk (#3 above) will not be
scanned for, and local items are determined to be identical/different from
the workspace version *solely by examining the read-only bit on the file*.

To redownload items deleted from your local disk (#3 above), supply the
/deletes option. To detect items which are different from the workspace
version but still have their read-only bit set (+R), supply the /diff option.
When using either or both of these options, tfpt scorch runs more slowly.

Usage: tfpt scorch [/exclude:filespec1,filespec2,…] [filespec…]
[/recursive] [/batchsize:num] [/noprompt [/preview]]
[/deletes] [/diff]

/noprompt Do not show the list of items to be deleted and
redownloaded in a dialog box for confirmation
/exclude:filespec[,..] Files and directories matching a filespec in this list
are excluded from processing
/preview Do not make changes; only list the potential actions
/recursive Switch from one level of recursion to full recursion
/deletes Detect and replace items missing from the local disk
/diff Use MD5 hashes to compare items with source control
/batchsize:num Set the batch size for server calls (default 500)
filespec… Only files and directories matching these filespecs
are processed (inclusion list)

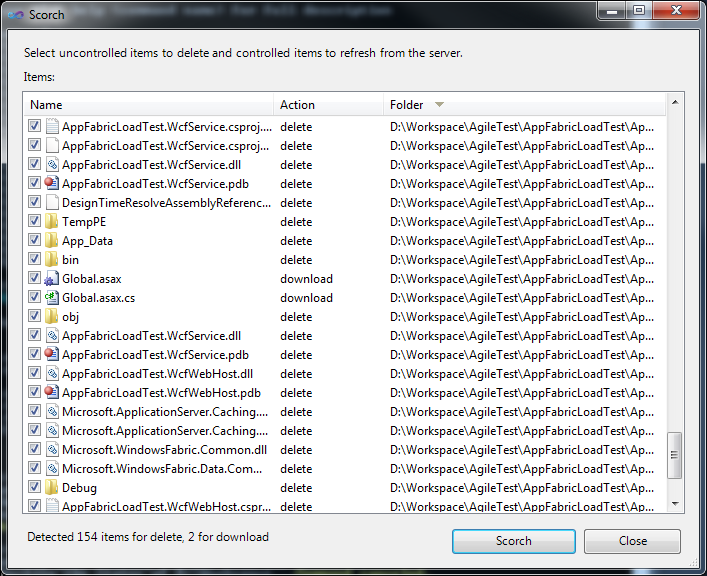
I’ve put my workspace in a clean situation, without having any item in checkout, to avoid loosing any changes, then I’ve run this command:

tfpt scorch /recursive /deletes

the /recursive argument will switch from one level of recursion to full recursion, making a deeper analysis
the /deletes argument will also detect missing files from the local disk and replace with the files from the source control.

After the command finish to run, it will be prompted to confirm the changes that will be done.

tfpt scorch deletes
tfpt scorch deletes

Another command that you can use just to remove the files that are not under version control is treeclean:

tfpt treeclean /recursive

tfpt treeclean – Delete files and folders not under version control

Usage: tfpt treeclean [/exclude:filespec1,filespec2,…] [filespec…]
[/recursive] [/batchsize:num] [/noprompt [/preview]]

/noprompt Operate in command-line mode only
/exclude:filespec[,..] Files and directories matching a filespec in this list
are excluded from processing
/preview Do not make changes; only list the potential actions
/recursive Switch from one level of recursion to full recursion
/batchsize:num Set the batch size for server calls (default 500)
filespec… Only files and directories matching these filespecs
are processed

This saved me from a boring time on cleaning scripts, hope you too.