WPF Design Time Resources Dictionary

[Reblogged from WPF Design Time Support (Part 2) thanks to jbe2277]

The WPF Designer works best if there is just one WPF project in the solution which is the application (exe) and so contains the App.xaml file. Then it will find all XAML resources that are necessary to render the views flawlessly. But in larger applications the views are often separated into different WPF projects (e.g. per module). In such a scenario the WPF designer is not able to find the resources defined or referenced in App.xaml anymore when this file resides in another project.

Microsoft introduced the Design-time Resources Dictionary file to overcome this issue. Blend is able to detect that some resources could not be resolved and asks us if we want to add a resource dictionary to use for displaying resources at design time.

blend-designtimeresources

Visual Studio uses this file as well but it is not able to create the file. If you want to create this file in Visual Studio then you have to create a Resource Dictionary (WPF). Use DesignTimeResources.xaml as file name and after creation move the file into the Properties folder in your project tree.

Now unload the project (Context menu of the project node in Solution Explorer). Then select Edit YourProject.csproj in the context menu of the unloaded project node. Search for the XML element that contains DesignTimeResources.xaml and replace it with the following XML snippet:

<Page Include="Properties\DesignTimeResources.xaml" Condition="'$(DesignTime)'=='true' OR ('$(SolutionPath)'!='' AND Exists('$(SolutionPath)') AND '$(BuildingInsideVisualStudio)'!='true' AND '$(BuildingInsideExpressionBlend)'!='true')">
  <Generator>MSBuild:Compile</Generator>
  <SubType>Designer</SubType>
  <ContainsDesignTimeResources>true</ContainsDesignTimeResources>
</Page>

Reload the project. The DesignTimeResource dictionary can be filled with MergedDictionaries. In the following example the merged dictionaries reside in another assembly. Thus, the long Source path is used.

<ResourceDictionary
    xmlns="http://schemas.microsoft.com/winfx/2006/xaml/presentation" 
    xmlns:x="http://schemas.microsoft.com/winfx/2006/xaml">

    <ResourceDictionary.MergedDictionaries>
        <ResourceDictionary Source="/Waf.InformationManager.Common.Presentation;Component/Resources/ImageResources.xaml"/>
        <ResourceDictionary Source="/Waf.InformationManager.Common.Presentation;Component/Resources/ConverterResources.xaml"/>

This file will be ignored by the compiler. It does not have any effects on the running application. It is just used to improve the design time experience.

C# .NET – Collections Comparison

generic.net.collection.interfaces

I liked a James Michael Hare’s post “C#/.NET Fundamentals: Choosing the Right Collection Class“, and I like to re-blog the comparison table:

Collection Ordering Contiguous Storage? Direct Access? Lookup Efficiency ManipulateEfficiency Notes
Dictionary Unordered Yes Via Key Key:O(1) O(1) Best for high performance lookups.
SortedDictionary Sorted No Via Key Key: O(log n) O(log n) Compromise of Dictionary speed and ordering, uses binarysearch tree.
SortedList Sorted Yes Via Key Key:O(log n) O(n) Very similar toSortedDictionary, except tree is implemented in an array, so has faster lookup on preloaded data, but slower loads.
List User has precise control over element ordering Yes Via Index Index: O(1)
Value: O(n)
O(n) Best for smaller lists where direct access required and no sorting.
LinkedList User has precise control over element ordering No No Value:O(n) O(1) Best for lists where inserting/deleting in middle is common and no direct access required.
HashSet Unordered Yes Via Key Key:O(1) O(1) Unique unordered collection, like a Dictionary except key and value are same object.
SortedSet Sorted No Via Key Key:O(log n) O(log n) Unique sorted collection, like SortedDictionary except key and value are same object.
Stack LIFO Yes Only Top Top: O(1) O(1)* Essentially same as List except only process as LIFO
Queue FIFO Yes Only Front Front: O(1) O(1) Essentially same as List except only process as FIFO

Linq Take Random – Query to Get a Random Sub Collection – Random Order

While writing a load test today, I had to simulate different kind of customers with different kind of taste, and I had a collection of item ids, and to simulate a random distribution, I had to generate a sub collection taking random ids from the collection source, in that way I can simulate different kind of customers that will end-up querying the server requesting different item details.

Googling a little-bit I found an easy way to do this, and is to Order the collection by a different Guid for each row:

var result = collection.OrderBy(t => Guid.NewGuid());

and to get (take) 10 random elements:

var result = collection.OrderBy(t => Guid.NewGuid()).Take(10);

From the Scott Mitchell’s post, you can see some empirical tests that proves a nice random distribution. Of course this is not to use in production code where you absolutely need an unpredictable results, but for load testing, and other take-it-easy purpose, that’s cool.

This is a LINQPad example:

void Main()
{
	var collection = Enumerable.Range(1, 100).ToList();
	
	for (int i = 0; i < 3; i++)
	{
		collection.OrderBy(t => Guid.NewGuid()).Take(10).Dump();
	}
}

linq-take-random

Convert XML and JSON to C# Classes

Today I found a cool Visual Studio functionality: you can paste an XML or JSON source as Classes, in fact creating all the object model to serialize and deserialize object with the xml format, all this without using xsd.exe tool.

Here’s the very simple steps regarding an XML but it’s the same for JSON:

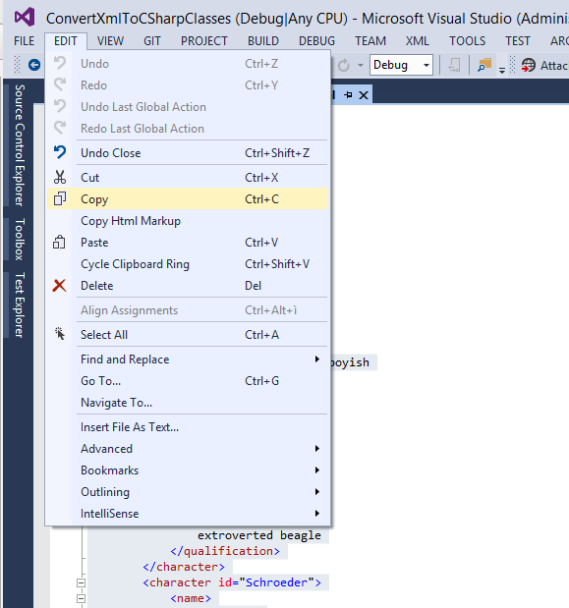
1 – The most difficult step….. copy the xml source in the clipboard, something like CTRL+A and CTRL+C 🙂

Image

Is ridiculous to add a screenshot, but I’ve got it, so why not!

2 – Create a new empy class file… no more screenshot please! ok here we go 😉

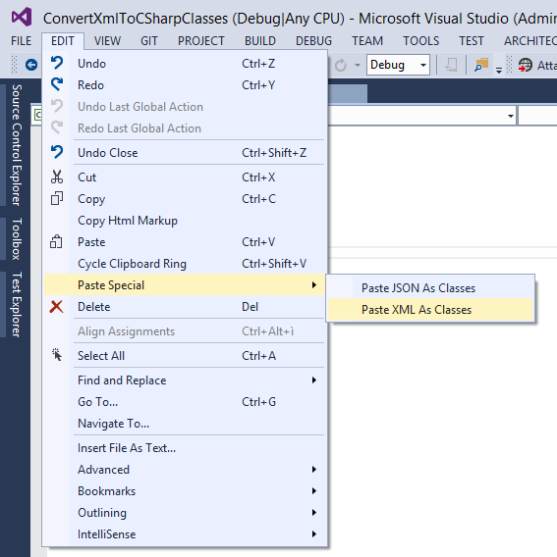
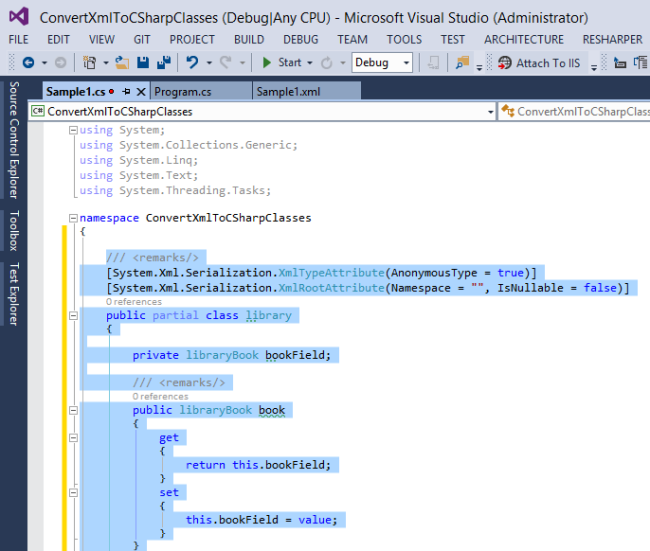
3 – Go to Edit -> Paste Special -> Paste XML As Classes, to paste the generated classes based on the source xml

Image

Image

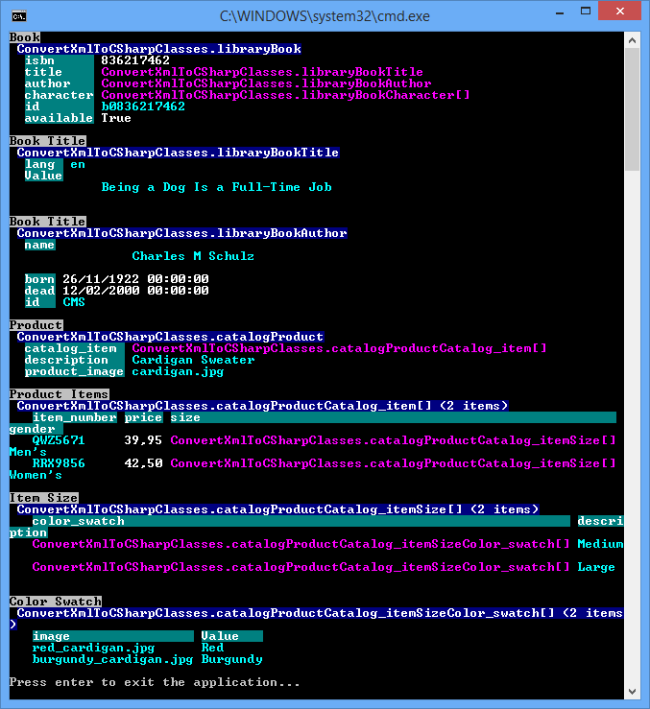
Here’s the code I’ve used to test the deserialization:

using System;
using System.IO;
using System.Text;
using System.Xml.Serialization;
using ConsoleDump;
using ConvertXmlToCSharpClasses.Properties;

namespace ConvertXmlToCSharpClasses
{
    internal class Program
    {
        private static void Main(string[] args)
        {
            TestSample1();

            TestSample2();

            Console.WriteLine("Press enter to exit the application...");
            Console.ReadLine();
        }

        private static void TestSample1()
        {
            var serializer = new XmlSerializer(typeof(library));
            var buffer = Encoding.UTF8.GetBytes(Resources.Sample1);
            using (var stream = new MemoryStream(buffer))
            {
                var library = (library)serializer.Deserialize(stream);
                library.book.Dump("Book");
                library.book.title.Dump("Book Title");
                library.book.author.Dump("Book Title");
            }
        }

        private static void TestSample2()
        {
            var serializer = new XmlSerializer(typeof(catalog));
            var buffer = Encoding.UTF8.GetBytes(Resources.Sample2);
            using (var stream = new MemoryStream(buffer))
            {
                var catalog = (catalog)serializer.Deserialize(stream);
                catalog.product.Dump("Product").catalog_item.Dump("Product Items")[0].size.Dump("Item Size")[0].color_swatch.Dump("Color Swatch");
            }
        }
    }
}

You can also download the test project.

4 – Enjoy your saved time

Image


WPF: ContentControl vs ContentPresenter

A small post to explain the little but important difference between ContentControl and ContentPresenter.

The most significant difference is that ContentPresenter has the ContentSource property while ContentControl hasn’t.

The ContentPresenter.ContentSource property specify which dependency property of the parent template instnace should be used to fill the ContentPresenter.Content.

For instance if you have a UserControl “MyControl” that defines a dependency property called  “MyProperty”, you can use the value of MyControl.MyProperty in the MyControl.Template in this way:

<ControlTemplate TargetType="MyControl">
      <StackPanel>
          <ContentPresenter ContentSource="MyProperty" />
      </StackPanel>
</ControlTempalte>

Instead using the ContentControl you could write the same template in this way:

<ControlTemplate TargetType="MyControl">
      <StackPanel>
          <ContentControl Content="{TemplateBinding MyProperty}" />
      </StackPanel>
</ControlTempalte>

In fact the ContentControl has a template that uses a ContentPresenter to show it’s own Content property using the ContentSource. The ContentPresenter is a light-weight component that is supposed to be used in a template as a simple place-holder for the Content property. The default value for the ContentPresenter.ContentSource is “Content”, so you just need to add an empty ContentPresenter in a template to let be the place-holder of the Content property of the template parent instance.

WPF: Attached Property in XAML Markup (The object ‘…’ already has a child and cannot add ‘…’)

Let’s say you need an attached property to set an arbitrary header content to any DependencyObject, to let you use that value and populate the Header property of any HeaderedContentControl, creating the class directly in your WPF test application:

public static class HeaderManager
{
	public static readonly DependencyProperty HeaderProperty = DependencyProperty.RegisterAttached(
		&quot;Header&quot;,
		typeof(object),
		typeof(HeaderManager),
		new PropertyMetadata(null));

	public static void SetHeader(DependencyObject element, object value)
	{
		element.SetValue(HeaderProperty, value);
	}

	public static object GetHeader(DependencyObject element)
	{
		return (object)element.GetValue(HeaderProperty);
	}
}

Then you want to attach that property to an UserControl that when injected in a TabItem can self declare it’s own header, and in first attempt you will end up trying to do this:

&lt;UserControl x:Class=&quot;RadicalTabRegion.Presentation.FirstView&quot;
             xmlns=&quot;http://schemas.microsoft.com/winfx/2006/xaml/presentation&quot;
             xmlns:x=&quot;http://schemas.microsoft.com/winfx/2006/xaml&quot;
             xmlns:mc=&quot;http://schemas.openxmlformats.org/markup-compatibility/2006&quot;
             xmlns:d=&quot;http://schemas.microsoft.com/expression/blend/2008&quot;
             xmlns:s=&quot;clr-namespace:RadicalTabRegion.Presentation.Regions.Specialized&quot;
             mc:Ignorable=&quot;d&quot;
             d:DesignHeight=&quot;300&quot; d:DesignWidth=&quot;300&quot;&gt;

    &lt;s:HeaderManager.Header&gt;
        &lt;StackPanel Orientation=&quot;Horizontal&quot;&gt;
            &lt;TextBlock Text=&quot;First View&quot;/&gt;
            &lt;CheckBox/&gt;
        &lt;/StackPanel&gt;
    &lt;/s:HeaderManager.Header&gt;

    &lt;Grid&gt;
        &lt;TextBlock Text=&quot;I'm the first view&quot;/&gt;
    &lt;/Grid&gt;

&lt;/UserControl&gt;

But if you try to compile this, you will get this error:

“The object ‘UserControl’ already has a child and cannot add ‘Grid’. ‘UserControl’ can accept only one child.”

This is because the compiler needs to know that HeaderManager.Header is an attached property, before compile xaml in baml, but because the HeaderManager class is declared in the same assembly of the xaml, it can’t. Actually I think this can be overcome by Microsoft, but never mind there’s a couple of solutions for that.

The first solution is to move the markup declaration after the first element in the UserControl content, and our case after the Grid:

&lt;UserControl x:Class=&quot;RadicalTabRegion.Presentation.FirstView&quot;
             xmlns=&quot;http://schemas.microsoft.com/winfx/2006/xaml/presentation&quot;
             xmlns:x=&quot;http://schemas.microsoft.com/winfx/2006/xaml&quot;
             xmlns:mc=&quot;http://schemas.openxmlformats.org/markup-compatibility/2006&quot;
             xmlns:d=&quot;http://schemas.microsoft.com/expression/blend/2008&quot;
             xmlns:s=&quot;clr-namespace:RadicalTabRegion.Presentation.Regions.Specialized&quot;
             mc:Ignorable=&quot;d&quot;
             d:DesignHeight=&quot;300&quot; d:DesignWidth=&quot;300&quot;&gt;

    &lt;Grid&gt;
        &lt;TextBlock Text=&quot;I'm the first view&quot;/&gt;
    &lt;/Grid&gt;

    &lt;s:HeaderManager.Header&gt;
        &lt;StackPanel Orientation=&quot;Horizontal&quot;&gt;
            &lt;TextBlock Text=&quot;First View&quot;/&gt;
            &lt;CheckBox/&gt;
        &lt;/StackPanel&gt;
    &lt;/s:HeaderManager.Header&gt;

&lt;/UserControl&gt;

The second solution is to move the HeaderManager class into a different class library, so in a different assembly, and this is the best approach because let you use the attached property more naturally, without incurring in that compile error even if you declare the property just before the UserControl.Content, that is more natural for an Header property. For instance if you add the class into a class library called “RadicalTabRegion.Windows.Presentation” you will end-up with this XAML that just works fine:

&lt;UserControl x:Class=&quot;RadicalTabRegion.Presentation.FirstView&quot;
             xmlns=&quot;http://schemas.microsoft.com/winfx/2006/xaml/presentation&quot;
             xmlns:x=&quot;http://schemas.microsoft.com/winfx/2006/xaml&quot;
             xmlns:mc=&quot;http://schemas.openxmlformats.org/markup-compatibility/2006&quot;
             xmlns:d=&quot;http://schemas.microsoft.com/expression/blend/2008&quot;
             xmlns:s=&quot;clr-namespace:RadicalTabRegion.Windows.Presentation.Regions.Specialized;assembly=RadicalTabRegion.Windows.Presentation&quot;
             mc:Ignorable=&quot;d&quot;
             d:DesignHeight=&quot;300&quot; d:DesignWidth=&quot;300&quot;&gt;

    &lt;s:HeaderManager.Header&gt;
        &lt;StackPanel Orientation=&quot;Horizontal&quot;&gt;
            &lt;TextBlock Text=&quot;First View&quot;/&gt;
            &lt;CheckBox/&gt;
        &lt;/StackPanel&gt;
    &lt;/s:HeaderManager.Header&gt;

    &lt;Grid&gt;
        &lt;TextBlock Text=&quot;I'm the first view&quot;/&gt;
    &lt;/Grid&gt;

&lt;/UserControl&gt;

This example is a part of an implementation I’m making for Radical to implement a TabControlRegion, that is able to inject a simple UserControl into a TabItem (generated at runtime) and let the developer deeply customize the TabItem.Header simply declaring the attached property directly into the UserControl. This is under development right now, and it is just one of the possible solutions, if I will like it, I will post the entire code, and pull a request for integrating the new region directly into Radical.

C#: Enable Cookie Container on System.Net.WebClient (for Authentication)

As I told on the previous post the WebClient can be easily extended to add more functionality such in this case the Cookie Container, and let use it to authenticate versus the web pages that are protected using an authenticated cookie:

public class CookieWebClient : WebClient
{
	public CookieContainer CookieContainer { get; private set; }

	/// <summary>
	/// This will instanciate an internal CookieContainer.
	/// </summary>
	public CookieWebClient()
	{
		this.CookieContainer = new CookieContainer();
	}

	/// <summary>
	/// Use this if you want to control the CookieContainer outside this class.
	/// </summary>
	public CookieWebClient(CookieContainer cookieContainer)
	{
		this.CookieContainer = cookieContainer;
	}

	protected override WebRequest GetWebRequest(Uri address)
	{
		var request = base.GetWebRequest(address) as HttpWebRequest;
		if (request == null) return base.GetWebRequest(address);
		request.CookieContainer = CookieContainer;
		return request;
	}
}

And then you can use it as follow:

using (var client = new CookieWebClient())
{
	var loginData = new NameValueCollection
	{
		{ "UserName", "TestUser" },
		{ "Password", "MyPassword" }
	};

	// Login into the website (at this point the Cookie Container will do the rest of the job for us, and save the cookie for the next calls)
	client.UploadValues("http://domain.com/Account/LogOn", "POST", loginData);

	// Call authenticated resources
	client.UploadString("http://domain.com/ProtectedArea/MyProtectedResource", "POST", "some data");
}

CookieWebClient takes also a CookieContainer as parameter, to let you control the cookie container outside, and passing over different CookieWebclient instantiation.

How to use a Local Storage Resource

The Windows Azure Managed Library provides classes for accessing the local storage resource from within code that is running in a role instance.

You will just need to retrieve the full path of a named local storage, and then you can store any file you want. To retrieve the full path, you simple need this line of code:

RoleEnvironment.GetLocalResource("MainLocalStorage").RootPath

C#: Enable Automatic Decompression on System.Net.WebClient

The WebClient class is really easy to use, but actually doesn’t provide so much control over the underline request, or so it seems, but we can still inherits from it to get the control over the WebRequest that the WebClient using.

With this in mind I’ve could extend the WebClient enabling the powerfull AutomaticDecompression of the HttpWebRequest, and getting compressed web resources:

public class AutomaticDecompressionWebClient : WebClient
{
	protected override WebRequest GetWebRequest(Uri address)
	{
		var request = base.GetWebRequest(address) as HttpWebRequest;
		if (request == null) throw new InvalidOperationException("You cannot use this WebClient implementation with an address that is not an http uri.");
		request.AutomaticDecompression = DecompressionMethods.Deflate | DecompressionMethods.GZip;
		return request;
	}
}